The administrators or the employer with admin access to the wellness platform can add one or more users at a time. While a single user can be added at the click of a button, bulk users must be added by uploading the details via an Excel sheet or CSV file. While the Excel sheet has a set format for adding user details to the Eligibility file which must not be altered, it can be customized in the .csv format to add more fields. (For more customizations, contact your account manager).
Adding A Single User - Below are the steps to add a single new user to the wellness program from the Admin portal.
1. Log in to the admin portal.
2. Navigate to the User Setup section from the left menu panel and click on Eligibility File.
3. Click on the '+Employee' button on the top right of the page.
4. Enter all the required details of the user like Employee ID, first and last name, Date of Birth, registered email ID, location, and other details in the pop-up, and 'Save' them.
5. A user record will be created and displayed along with the other user records. 
6. Each user record has 4 action icons across it -
Edit - to edit and update user information
Delete - to delete the user record of unregistered users
Send email - to send the email for program registration
Terminate - to terminate registered users from the program

7. After creating the user record, click on the 'Send Email' icon to send the onboarding email to the user's registered email ID.
Adding Bulk Users - Below are the steps to add the bulk of new users to the wellness program from the Admin portal.
1. Log in to the admin portal.
2. Navigate to the User Setup section from the left menu panel and click on Eligibility File.
3. Click the Download icon for .xls or .csv format at the top left.
4. Enter all the required details of the user in the Excel or CSV file and save them.
5. Upload the saved file by clicking on the relevant 'Upload CSV' or 'Upload Excel' button on the User Eligibility Files page.

6. After the successful uploading of the file, the user records will be created for the added users and displayed along with the other user records.
7. After creating the user record, click the 'Send Email' icon across the newly added users to send the onboarding email to their registered email ID.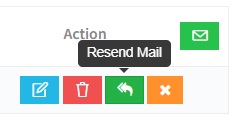
8. If the registration email has to be sent to all the users, click on the email icon at the top right.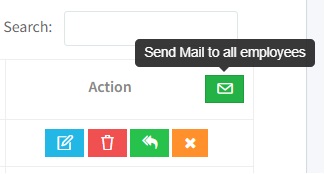
Note: To add multiple new users using the .csv format of the file, click on 'New Employee' under the Upload CSV dropdown. Similarly, to update the information of multiple users, click on 'Update Employee Info' under the dropdown and upload the saved file.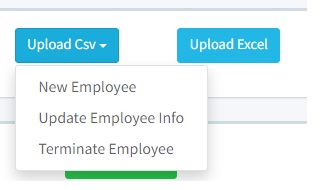
Was this article helpful?
That’s Great!
Thank you for your feedback
Sorry! We couldn't be helpful
Thank you for your feedback
Feedback sent
We appreciate your effort and will try to fix the article